Check out authentication to Azure AD/Entra ID with a Windows Hello PIN on openSUSE Tumbleweed!
Here’s how to get started for yourself.
First, install the package in Tumbleweed:
sudo zypper in himmelblau nss-himmelblau pam-himmelblau
Next configure /etc/himmelblau/himmelblau.conf and set the parameter ‘domains’ to a comma separated list of allowed domains, then set ‘pam_allow_groups’ to a comma separated list of allowed users and groups. All other parameters in the himmelblau.conf are optional.
Configure pam:
sudo pam-config --add --himmelblau
You may need to do additional pam configuration. Check out the readme.
You’re all set! Domain enrollment happens automatically the first time someone logs in. Each time a new user logs in, they’ll be prompted to enroll a Windows Hello PIN for the device (Hello PIN auth is introduced in Himmelblau 0.3.0). Subsequently, that user will authenticate with their Hello PIN.
Microsoft’s Azure AD (Entra ID) is a popular choice for identity and device management. Until recently, Linux systems lacked a comprehensive solution for integrating seamlessly with these Microsoft services. Enter Himmelblau, a project meant to bridge the gap between Linux and Microsoft’s cloud ecosystem.
The Power of Intune Integration
Beyond authentication, Himmelblau plans to extend its capabilities to enforce Intune MDM policies on Linux devices. Intune is Microsoft’s cloud-based solution for managing and securing devices, and with Himmelblau, Linux systems can now be brought under the umbrella of Intune’s management capabilities. This means that IT administrators can maintain consistent security and compliance standards across both Windows and Linux devices, streamlining the management process and enhancing overall security posture.
Enhancing Security with Multi-Factor Authentication
In an era where security breaches pose a significant threat, Himmelblau is integrating Azure AD Multi-Factor Authentication (MFA) to add an extra layer of protection before granting access to Linux systems.
Offline Logon and Hardware TPM Integration in Himmelblau
Himmelblau has integrated the Hardware Trusted Platform Module (TPM) into its authentication process. By utilizing a hardware TPM, Himmelblau prevents ex-filtration and attacks against cached password hashes that are used for offline authentication.
Authentication Across Any Cloud Endpoint
Himmelblau stands out for its flexibility and adaptability by seamlessly accommodating authentication with any Azure cloud endpoint.
Himmelblau’s Fortified Foundation
Himmelblau is written in Rust. With its focus on memory safety, Rust mitigates the risk of common programming errors such as buffer overflows and null pointer dereferences, which are potential vulnerabilities often exploited by attackers. The strict ownership and borrowing system in Rust enforces strong memory management, preventing issues like dangling pointers and data races that can lead to security breaches. Rust’s strict compiler checks play a crucial role in eliminating entire classes of bugs before they even emerge. This proactive approach to preventing vulnerabilities at the development stage contributes to a more secure codebase, reducing the likelihood of exploitation in production.
Let’s clarify the difference between openSUSE’s stable and testing ground distros. openSUSE Leap is a stable, enterprise-compatible distro, while openSUSE Tumbleweed serves as the testing ground for SLES and openSUSE Leap. I bring this up because I have repeatedly seen misinformation in community conversations about the state of enterprise Linux. Leap is not a testing ground.
SUSE was founded in 1992 (yes, that’s one year after Linus initially created Linux) in Nuremberg, Germany. Since then, SUSE has grown to have an international presence. SUSE is a publicly traded company and the largest independent open-source software company in the industry.
Similar to Red Hat, SUSE provides a Linux distribution tailored specifically for enterprise environments, catering to the needs of businesses of all sizes. SUSE provides long-term support, ensuring stability, security, and reliability for critical workloads in production environments.
Also, like Red Hat, SUSE follows a subscription-based model, where customers pay for access to their respective distributions along with technical support, maintenance, and updates. This model ensures that organizations receive timely security patches, bug fixes, and feature enhancements, allowing them to maintain a stable and secure infrastructure. Unlike Red Hat, the sources are freely available, and openSUSE Leap updates happen in sync with SLES updates.
In addition to providing enterprise support for SUSE Linux, SUSE also provides enterprise support and updates for RHEL via SUSE Liberty Linux.
In summary, openSUSE Leap has emerged as a compelling alternative to CentOS, particularly in light of the changes at Red Hat. Considering these factors, openSUSE Leap, with its robust enterprise support, adherence to open-source principles, and active community, presents a compelling option for businesses seeking a reliable and secure Linux distribution for their infrastructure.
I’ve completed the first version of a book of instructions to use Samba’s client Group Policy. You can download a pdf or ebook here, purchase a print copy from Amazon, or you can read the web version. I’m only charging printing cost for the physical book (in accordance with the license). Digital copies are all free.
The purpose of the book is to provide detailed instructions to get folks up and running using Samba’s client Group Policy. I’ve received numerous requests for help on the mailing lists, and many of the questions are simple ones. Previously none of this information was documented well anywhere.
If you encounter problems getting setup, or find errors in the book, please contact me. You can also contribute to the book if you wish.
One of the primary issues preventing the last few holdouts from migrating away from SMB1 is a lack of Posix/UNIX extensions in SMB2+. SMB1 is definitely going away though in the near future.
To compensate, the community has been hard at work creating a new UNIX extension standard for SMB3. These have been in the works since as early as 2010, but have recently seen some renewed interest in completion. The Linux ksmbd server and cifs client both support SMB3 UNIX extensions. Several third party servers also offer support. Support from Samba server is nearing completion.
A critical part of implementing a new standard is documenting that standard. I, along with several other members of the Samba team, have collaborated on an open standard (not GPL), which fits neatly in with the other SMB protocol documents. The project is currently hosted on codeberg. The license is intentionally friendly to both opensource and closed source.
The details of the documentation are only now being written down, but have been hashed out over the past 12 years in various iterations. A preliminary version of the specification is available below.
The first step to deploying Group Policy is to create a Server Side Extension (SSE). There are multiple ways to create an SSE, but here we’ll only discuss Administrative Templates (ADMX). The purpose of the SSE is to deploy policies to the SYSVOL share. Theoretically, you could manually deploy any file (even plain text) to the SYSVOL and then write a Client Side Extension that parses it, but ADMX can be read and modified by the Group Policy Management Editor, which makes administration of policies simpler.
ADMX files are simply XML files which explain to the Group Policy Management Console how to display and store a policy in the SYSVOL. AMDX files always store policies in Registry.pol files. Samba provides a mechanism for parsing these, which we’ll discuss later.
Below is a simple example of an ADMX template, and it’s corresponding ADML file.
<policyDefinitionResources revision="1.0" schemaVersion="1.0">
  <displayName>
  </displayName>
  <description>
  </description>
  <resources>
    <stringTable>
      <string id="CAT_3338C1DD_8A00_4273_8547_158D8B8C19E9">Samba</string>
      <string id="CAT_7D8D7DC8_5A9D_4BE1_8227_F09CDD5AFFC6">Unix Settings</string>
      <string id="POL_9320E11F_AC80_4A7D_A5C8_1C0F3F727061">Daily Scripts</string>
      <string id="POL_9320E11F_AC80_4A7D_A5C8_1C0F3F727061_Help">This policy setting allows you to execute commands,
either local or on remote storage, daily.</string>
    </stringTable>
    <presentationTable>
      <presentation id="POL_9320E11F_AC80_4A7D_A5C8_1C0F3F727061">
        <listBox refId="LST_2E9A4684_3C0E_415B_8FD6_D4AF68BC8AC6">Script and arguments</listBox>
      </presentation>
    </presentationTable>
  </resources>
</policyDefinitionResources>
The meaning of the various tags are explained in Microsoft’s Group Policy documentation. Before the endless documentation and confusing XML scares you away, be aware there is an easier way!
ADMX Migrator
FullArmor created the ADMX Migrator to simplify the shift for system administrators from the old ADM policy templates to ADMX. Fortunately, this tool also serves our purpose for assisting us in easily creating these templates for our SSE. Unfortunately, the tool hasn’t seen any development in the past 8 years, and wont run in Windows 10 (or any Unix/Linux platform, for that matter). I had to dredge up a Windows 7 VM in order to install and use the tool (supposedly Vista works as well, but who wants to install that?).
Creating the Administrative Template
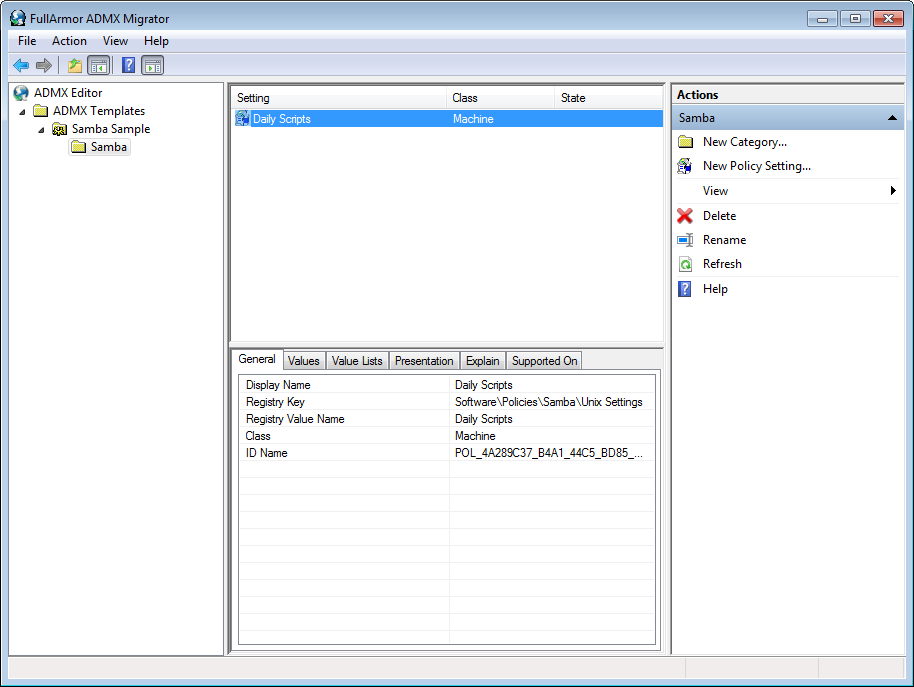
Open ADMX Migrator
Right click on ADMX Templates in the left tree view, and click New Template.
Give your template a name, and click OK.
Right click on the new template in the left tree view, and click New Category.
Give the Category a name. This name will be displayed in the Group Policy Management Editor under Administrative Templates. You can choose to nest template under an existing category, or simply add it as a new root. Note: You can also add sub-categories under this category. After clicking OK, right click the category you created and select New Category.
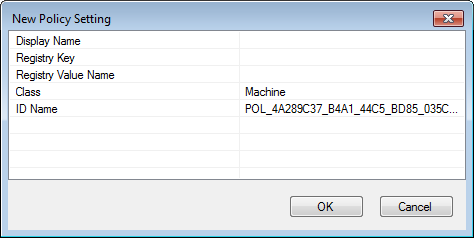
Next, create your policy by right clicking on your new category, and selecting New Policy Setting.
Because we’ll be applying these settings to a Linux machine, the Registry fields are mostly meaningless, but they are required. Your policies will be stored under these keys on the SYSVOL in the Registry.pol file. Choose some sensible Registry Key, such as ‘Software\Policies\Samba\Unix Settings’, and a Registry Value Name, such as ‘Daily Scripts’ (these are the values used for Samba’s cron.daily policy). The Display Name is the name that will be displayed for this policy in the Group Policy Management Editor. I usually make this the same as the Registry Value Name, but it doesn’t need to be.
Select whether this policy will be applied to a Machine, a User, or to Both in the Class field. In our example, we could potentially set Both, then our Client Side Extension would need to handle both cron.daily scripts (the Machine) and also User crontab entries. Click OK for your policy to be created.
Your new policy will appear in the middle list view. Highlight it, and you will see a number of tabs below for configuring the policy.
Select the Values tab and set the Enabled Value Type. In this case, we’ll use String, since our cron commands will be saved to the Registry.pol as a string. In the Value field, you can set a default enabled value (this is optional).
Select the Presentation tab, right click in the Elements view, and click New Element > ListBox (or a different presentation, depending on the policy). If you look at the samba.adml file from the previous section, you’ll notice that the presentationTable contains a listBox item. That’s what we’re creating here.
Choose an element Label, this will be the name for the list displayed in the Group Policy Management Editor.
Choose a Registry Key. This will be pre-populated with the parent Registry Key you gave when creating the policy. Append something to the key to make it unique. We’ll use ‘Software\Policies\Samba\Unix Settings\Daily Scripts’ for our cron.daily policy.
Navigate to the Explain tab, and add an explanation of what this policy is and what it does. This will be displayed to users in the Group Policy Management Editor.
Now right click on your template name in the left tree, and select Save As.
Finally, you’ll need to deploy your new policy definition to the SYSVOL. It should be saved to the Policies\PolicyDefinitions (the Group Policy Central Store) directory. These instructions from Microsoft can assist you in setting up your Group Policy Central Store.
Creating the Client Side Extension
The Client Side Extension (CSE) is the code that will be called by Samba’s Winbind to deploy our newly created policy to a client machine. CSEs must be written in Python3, and are deployed using the register_gp_extension() and unregister_gp_extension() samba functions.
#!/usr/bin/python3
# gp_scripts_ext samba gpo policy
# Copyright (C) David Mulder <dmulder@suse.com> 2020
#
# This program is free software; you can redistribute it and/or modify
# it under the terms of the GNU General Public License as published by
# the Free Software Foundation; either version 3 of the License, or
# (at your option) any later version.
#
# This program is distributed in the hope that it will be useful,
# but WITHOUT ANY WARRANTY; without even the implied warranty of
# MERCHANTABILITY or FITNESS FOR A PARTICULAR PURPOSE.  See the
# GNU General Public License for more details.
#
# You should have received a copy of the GNU General Public License
# along with this program.  If not, see <http://www.gnu.org/licenses/>.

import os, re
from samba.gpclass import gp_pol_ext, register_gp_extension, \
    unregister_gp_extension, list_gp_extensions
from base64 import b64encode
from tempfile import NamedTemporaryFile
from samba import getopt as options
import optparse

intro = '''
### autogenerated by samba
#
# This file is generated by the gp_scripts_ext Group Policy
# Client Side Extension. To modify the contents of this file,
# modify the appropriate Group Policy objects which apply
# to this machine. DO NOT MODIFY THIS FILE DIRECTLY.
#

'''

class gp_scripts_ext(gp_pol_ext):
    def __str__(self):
        return 'Unix Settings/Scripts'

    def process_group_policy(self, deleted_gpo_list, changed_gpo_list):

        # Iterate over GPO guids and their previous settings, reverting
        # changes made by this GPO.
        for guid, settings in deleted_gpo_list:

            # Tell the Group Policy database which GPO we're working on
            self.gp_db.set_guid(guid)

            if str(self) in settings:
                for attribute, script in settings[str(self)].items():
                    # Delete the applied policy
                    if os.path.exists(script):
                        os.unlink(script)

                    # Remove the stored removal information
                    self.gp_db.delete(str(self), attribute)

            # Commit the changes to the Group Policy database
            self.gp_db.commit()

        # Iterate over GPO objects, applying new policies found in the SYSVOL
        for gpo in changed_gpo_list:
            if gpo.file_sys_path:
                reg_key = 'Software\\Policies\\Samba\\Unix Settings'
                sections = { '%s\\Daily Scripts' % reg_key : '/etc/cron.daily',
                             '%s\\Monthly Scripts' % reg_key : '/etc/cron.monthly',
                             '%s\\Weekly Scripts' % reg_key : '/etc/cron.weekly',
                             '%s\\Hourly Scripts' % reg_key : '/etc/cron.hourly' }

                # Tell the Group Policy database which GPO we're working on
                self.gp_db.set_guid(gpo.name)

                # Load the contents of the Registry.pol from the SYSVOL
                pol_file = 'MACHINE/Registry.pol'
                path = os.path.join(gpo.file_sys_path, pol_file)
                pol_conf = self.parse(path)
                if not pol_conf:
                    continue

                # For each policy in the Registry.pol, apply the settings
                for e in pol_conf.entries:
                    if e.keyname in sections.keys() and e.data.strip():
                        cron_dir = sections[e.keyname]
                        attribute = '%s:%s' % (e.keyname,
                                b64encode(e.data.encode()).decode())

                        # Check if this policy has already been applied in the
                        # Group Policy database. Skip the apply if it's already
                        # been installed.
                        old_val = self.gp_db.retrieve(str(self), attribute)

                        if not old_val:

                            # Create a temporary file and store policy in it,
                            # then move the file to the cron directory for
                            # execution.
                            with NamedTemporaryFile(prefix='gp_', mode="w+",
                                    delete=False, dir=cron_dir) as f:
                                contents = '#!/bin/sh\n%s' % intro
                                contents += '%s\n' % e.data
                                f.write(contents)
                                os.chmod(f.name, 0o700)

                                # Store the name of the applied file, so that
                                # we can remove it later on unapply (see the
                                # first loop in this function).
                                self.gp_db.store(str(self), attribute, f.name)

                        # Commit the changes to the Group Policy database
                        self.gp_db.commit()

    def rsop(self, gpo):
        output = {}
        pol_file = 'MACHINE/Registry.pol'
        if gpo.file_sys_path:
            path = os.path.join(gpo.file_sys_path, pol_file)
            pol_conf = self.parse(path)
            if not pol_conf:
                return output
            for e in pol_conf.entries:
                key = e.keyname.split('\\')[-1]
                if key.endswith('Scripts') and e.data.strip():
                    if key not in output.keys():
                        output[key] = []
                    output[key].append(e.data)
        return output

if __name__ == "__main__":
    parser = optparse.OptionParser('gp_scripts_ext.py [options]')
    sambaopts = options.SambaOptions(parser)
    parser.add_option_group(sambaopts)

    parser.add_option('--register', help='Register extension to Samba',
                      action='store_true')
    parser.add_option('--unregister', help='Unregister extension from Samba',
                      action='store_true')

    (opts, args) = parser.parse_args()

    # We're collecting the Samba loadparm simply to find our smb.conf file
    lp = sambaopts.get_loadparm()

    # This is a random unique GUID, which identifies this CSE.
    # Any random GUID will do.
    ext_guid = '{5930022C-94FF-4ED5-A403-CFB4549DB6F0}'
    if opts.register:
        # The extension path is the location of this file. This script
        # should be executed from a permanent location.
        ext_path = os.path.realpath(__file__)
        # The machine and user parameters tell Samba whether to apply this
        # extension to the computer, to individual users, or to both.
        register_gp_extension(ext_guid, 'gp_scripts_ext', ext_path,
                              smb_conf=lp.configfile, machine=True, user=False)
    elif opts.unregister:
        # Remove the extension and do not apply policy.
        unregister_gp_extension(ext_guid)

    # List the currently installed Group Policy Client Side Extensions
    exts = list_gp_extensions(lp.configfile)
    for guid, data in exts.items():
        print(guid)
        for k, v in data.items():
            print('\t%s: %s' % (k, v))
The gp_pol_ext/gp_inf_ext Python Classes
Your CSE must be a class that inherits from a subclass of gp_ext. The gp_pol_ext is a subclass of gp_ext that provides simplified parsing of Registry.pol files. If you choose to store your policies in ini/inf files in the SYSVOL (instead of using Administrative Templates), then you can inherit from the gp_inf_ext instead.
If your class inherits from either gp_pol_ext or gp_inf_ext, it has a parse() function defined, which takes a single filename. The parse() function will parse the contents of the policy file and return it in a sensible format.
If for some reason you choose to store data on the SYSVOL in some other format (such as in XML, etc), you’ll need to subclass gp_ext, then implement a read() function, like this:
import xml.etree.ElementTree
class gp_xml_ext(gp_ext):
    def read(self, data_file):
        return xml.etree.ElementTree.parse(data_file)
The read() function is called by parse(), passing it a local filename tied to the systems SYSVOL cache. Then within process_group_policy() you can call parse() to fetch the parsed data from the SYSVOL.
Process Group Policy
The process_group_policy() function serves two primary purposes; it applies new policy, and it removes old policy. In the example, you’ll notice there are two main loops. The first loop iterates over the deleted_gpo_list, which are all the policies that should be removed. The second loop iterates over the changed_gpo_list, which are new policies which must be applied.
Deleted GPOs
for guid, settings in deleted_gpo_list:
    self.gp_db.set_guid(guid)
    if str(self) in settings:
        for attribute, script in settings[str(self)].items():
            if os.path.exists(script):
                os.unlink(script)
            self.gp_db.delete(str(self), attribute)
    self.gp_db.commit()
The deleted_gpo_list is a dictionary which contains the guids of Group Policy Objects, with associated settings which were previously applied. This list of applied settings is generated by the second loop (changed_gpo_list) while it is applying policy. The self.gp_db object is a database handle which allows you to manipulate the Group Policy Database.
The Group Policy Database keeps track of all settings that have been applied, and info on how to revert those applied settings. For example, in the smb.conf CSE, the attribute stored in settings could be client max protocol and the stored value could be NT1. If our GPO has applied a client max protocol set to SMB3_11, the Group Policy database keeps track of the previous value of NT1 for when it’s time to remove the SMB3_11 policy.
In our example cron script policy above, you can see that the stored value is a filename (the script variable). This is actually the name of the script we’ve applied, which will allow us to delete it later (therefore removing the policy). The scripts CSE is a special case, where we don’t need to keep track of an old value to restore, instead we’re keeping track of files to delete (since the ‘old value’ is that the script didn’t exist).
Changed GPOs
for gpo in changed_gpo_list:
    if gpo.file_sys_path:
        reg_key = 'Software\\Policies\\Samba\\Unix Settings'
        sections = { '%s\\Daily Scripts' % reg_key : '/etc/cron.daily',
                     '%s\\Monthly Scripts' % reg_key : '/etc/cron.monthly',
                     '%s\\Weekly Scripts' % reg_key : '/etc/cron.weekly',
                     '%s\\Hourly Scripts' % reg_key : '/etc/cron.hourly' }
        self.gp_db.set_guid(gpo.name)
        pol_file = 'MACHINE/Registry.pol'
        path = os.path.join(gpo.file_sys_path, pol_file)
        pol_conf = self.parse(path)
        if not pol_conf:
            continue
        for e in pol_conf.entries:
            if e.keyname in sections.keys() and e.data.strip():
                cron_dir = sections[e.keyname]
                attribute = '%s:%s' % (e.keyname,
                        b64encode(e.data.encode()).decode())
                old_val = self.gp_db.retrieve(str(self), attribute)
                if not old_val:
                    with NamedTemporaryFile(prefix='gp_', mode="w+",
                            delete=False, dir=cron_dir) as f:
                        contents = '#!/bin/sh\n%s' % intro
                        contents += '%s\n' % e.data
                        f.write(contents)
                        os.chmod(f.name, 0o700)
                        self.gp_db.store(str(self), attribute, f.name)
                self.gp_db.commit()
The second loop is a little more involved. When we iterate over changed_gpo_list, we’re actually iterating over a list of GPO objects. The attributes of the object are:
gpo.name: The GUID of the GPO.
gpo.file_sys_path: A physical path to a cache of GPO on the local filesystem.
There are other methods and attributes, but these are the only ones important to a CSE.
The primary purpose of this loop is to iterate over the GPOs, read their policy in the SYSVOL, then check the sections for the Registry Key we created in our Server Side Extension. If our policy Registry Key exists, then we read the entry and apply the policy.
In our example, we find the ‘Software\Policies\Samba\Unix Settings\Daily Scripts’ policy, then read the script contents from Registry.pol entry and write the script to a local file. In the example code, we write the script to a temporary file, then move the file to it’s permanent location in /etc/cron.daily.
We also have to make sure we set the name of the new script in our self.gp_db (Group Policy Database). This ensures that we can remove the policy when we delete the GPO. At the beginning of our loop, we also need to ensure we call set_guid() on our Group Policy Database, so it knows which GPO we’re operating on.
Resultant Set of Policy
The rsop() function in the extension is optional. It should return a dictionary containing key/value pairs of what our current policy will or has applied. The function is passed a list of GPO objects (similar to our changed_gpo_list), and we should parse the list similar to how we did in our changed_gpo_list loop. The difference is that the rsop() function does not apply any policy. It only returns what will be applied. This function enables the samba-gpupdate --rsop command to report on applied, or soon to be applied policy.
Registering/Unregistering a Client Side Extension
The final step is to register an extension on the host. While the example code provides a detailed example of how to register an extension, the basic requirement is simply to call register_gp_extension().
The extension guid can be any random guid. It simply must be unique among all extensions that you register to the host. The extension path is literally just the path to the source file containing your CSE.
You must pass your smb.conf file to the extension, so it knows where to store the list of registered extensions. You also must specify whether to apply this extension to the machine, or to individual users (or to both).
Unregistering the extension is simple. You call the unregister_gp_extension() and pass it the unique guid you previously chose which represents this CSE.
Conclusion
I hope this tutorial proves useful. Please comment below if you have questions! You can also reach me on freenode in the samba-technical channel (nic: dmulder).
Samba version 4.14 will ship with Group Policy for Winbind. The Group Policy offerings are made to be similar to what is offered by proprietary tools, such as Vintela’s and Centrify’s Group Policy.
Group Policy Management Console
Winbind Group Policy provides the ability to distribute smb.conf settings, Sudo Privileges, Message of the Day and Login Prompt messages, and daily, hourly, monthly, or weekly cron jobs.
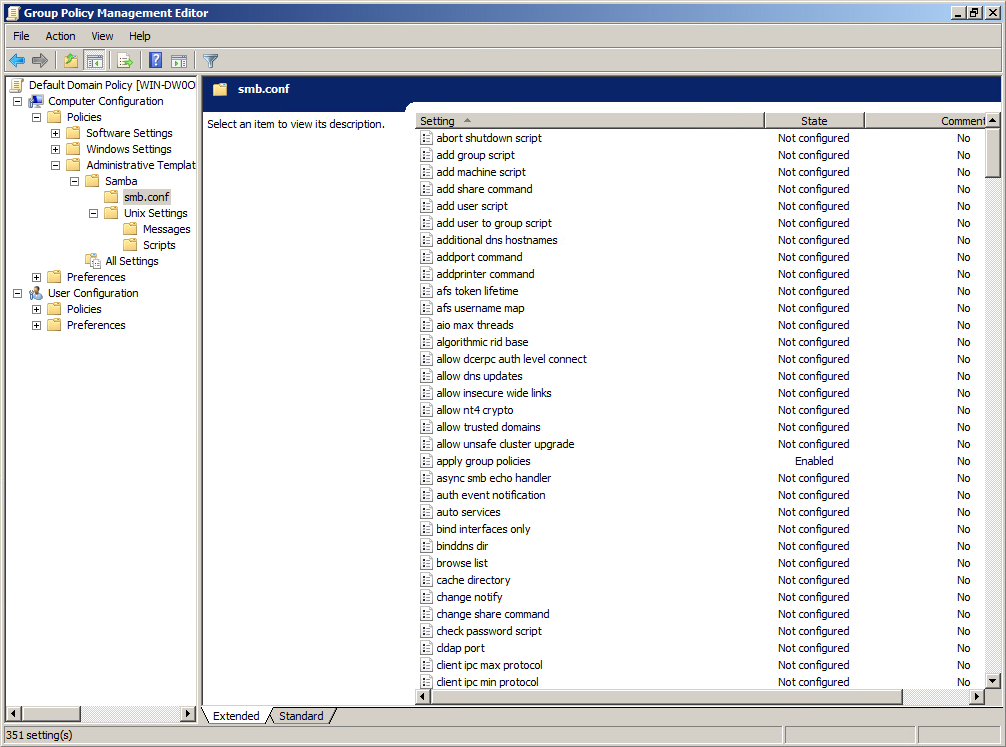
To enable Group Policy in Winbind, set the apply group policies global smb.conf option to Yes. You can even deploy this setting from Group Policy smb.conf options, then running the apply command manually the first time with sudo samba-gpupate --force.
In order to use the Samba Administrative Templates in the Group Policy Management Console, you’ll need to install them first, using the command sudo samba-tool gpo admxload -UAdministrator. This will upload the samba.admx template to the joined domains SYSVOL share.
Resultant Set of Policy
To see what policies will apply to a machine before applying them (or to view what policies are already applied), run the command sudo samba-gpupdate --rsop.
linux-h7xz:~ # samba-gpupdate --rsop
Resultant Set of Policy
Computer Policy

GPO: Default Domain Policy
============================================================
  CSE: gp_sec_ext
  ------------------------------
  ------------------------------
  CSE: gp_sec_ext
  ------------------------------
  ------------------------------
  CSE: gp_scripts_ext
  ------------------------------
  ------------------------------
  CSE: gp_sudoers_ext
  ------------------------------
    Policy Type: Sudo Rights
    ------------------------------
    [ tux ALL=(ALL) NOPASSWD: ALL ]
    ------------------------------
  ------------------------------
  CSE: gp_smb_conf_ext
  ------------------------------
    Policy Type: smb.conf
    ------------------------------
    [ apply group policies ] = 1
    [ client max protocol ] = SMB2_02
    ------------------------------
  ------------------------------
  CSE: gp_msgs_ext
  ------------------------------
    Policy Type: /etc/motd
    ------------------------------
This message is distributed by Samba!
    ------------------------------
    Policy Type: /etc/issue
    ------------------------------
Samba Group Policy \s \r \l
    ------------------------------
  ------------------------------
============================================================
smb.conf Policies
smb.conf policies are found in Computer Configuration > Policies > Administrative Templates > Samba > smb.conf. These policies distribute smb.conf global options to the client. This policy is unable to apply idmap policies.
Password and Kerberos Policies
Password and Kerberos policies, found in Computer Configuration > Policies > OS Settings > Security Settings > Account Policy, are only applicable to Samba Domain Controllers.
The following password policies are applicable:
Minimum password age
Maximum password age
Minimum password length
Password must meet complexity requirements
And Kerberos policies:
Maximum ticket age (Maximum lifetime for user ticket)
Maximum service age (Maximum lifetime for service ticket)
Maximum renew age (Maximum lifetime for user ticket renewal)
Script Policies
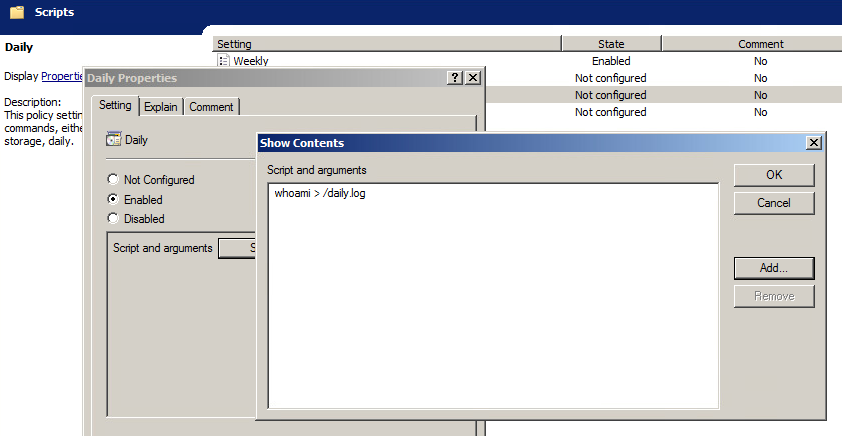
Script policies create cron jobs on client machines which execute the specified commands. Script policies are found in Computer Configuration > Policies > Administrative Templates > Samba > Unix Settings > Scripts.
To add a script policy, open the policy, enable it, and click Show. In the dialog that appears, add the command to execute on the client. Click OK, then Apply to save the policy.
Applying a Daily cron job
Script policies are applied as cron jobs on the winbind client.
Sudoers policies add sudo rules to client machines. Sudoers policies are found in Computer Configuration > Policies > Administrative Templates > Samba > Unix Settings > Sudo Rights.
To add a sudo policy, open the policy, enable it, and click Show. In the dialog that appears, add the sudo rules to the list. Click OK, then Apply to save the policy.
linux-h7xz:~ # /usr/sbin/samba-gpupdate --force
linux-h7xz:~ # cat /etc/sudoers.d/gp_eockoryg

### autogenerated by samba
#
# This file is generated by the gp_sudoers_ext Group Policy
# Client Side Extension. To modify the contents of this file,
# modify the appropriate Group Policy objects which apply
# to this machine. DO NOT MODIFY THIS FILE DIRECTLY.
#

tux ALL=(ALL) NOPASSWD: ALL
Message Policies
Message policies set the contents of the /etc/motd and /etc/issue files on client machines. Message policies are found in Computer Configuration > Policies > Administrative Templates > Samba > Unix Settings > Messages.
To add a message of the day policy, for example, open the policy and enable it. In the text box provided, enter the message you’d like displayed after a successful login.
linux-h7xz:~ # samba-gpupdate
linux-h7xz:~ # cat /etc/motd
This message is distributed by Samba!
To add a login prompt policy, open the ‘Logon Prompt Message’ policy and enable it. In the text box provided, enter the message you’d like displayed before the login prompt. You can use escape sequences supported by the client /etc/issue file.
I’ve been working on Group Policy deployment in Samba. Samba master (not released) currently now installs a samba-gpupdate script, which works similar to gpupdate on Windows (currently in master it defaults to –force, but that changes soon).
Group Policy can also apply automatically by setting the smb.conf option ‘apply group policies’ to yes.
Recently, I’ve written a client side extension (CSE) which applies samba smb.conf settings to client machines. I’ve also written a script which generates admx files for deploying those settings via the Group Policy Management Console.
WINEARCH=win32 WINEPREFIX=$HOME/.vmware-client ./winetricks msxml3 dotnet35sp1 vcrun2005 vcrun2008 vcrun2010
WINEARCH=win32 WINEPREFIX=$HOME/.vmware-client wine VMware-viclient-all-5.1.0-2306356.exe
When you get the hcmon install failure, copy the entire contents of your wine bottle to a tmp directory, complete the installation (says it failed), then mv the contents back.
cp $HOME/.vmware-client $HOME/.vmware-client2
Now you can run the vSphere Client with:
WINEARCH=win32 WINEPREFIX=$HOME/.vmware-client wine ~/.vmware-client/drive_c/Program Files/VMware/Infrastructure/Virtual Infrastructure Client/Launcher/VpxClient.exe
The biggest drawback is that the console doesn’t work, so install VMware Remote Console.
The remote console can connect to a vSphere server and provide the console functionality that’s broken in the client. Just provide it the host url, username, etc on the command line:
> /usr/bin/vmrc –help
Usage:
vmrc [OPTION…]
Help Options:
-h, –help Show help options
Application Options:
-v, –version Display the program version
-X, –fullscreen Start in fullscreen mode
-M, –moid=moid A managed object id indicating the VM to connect to
-U, –user=username Username used to authenticate to the remote host
-P, –password=password Password used to authenticate to the remote host
-D, –datacenter=datacenter Datacenter containing the VM to open
-H, –host=host:port Remote host containing VMs you wish to access